Monday, January 12, 2015

Gelatin Marshmallow Spirals


I saw something like this before and I finally got around to making them. The kids really enjoyed them and they were really easy and quick to make.

Start off with 1/2 cup warm water.
Stir in any flavor Gelatin you would like.
Microwave for about 1 min. 30 seconds. 
Stir until gelatin is dissolved.

You then add to the gelatin mixture 1 1/2 cups mini marshmallows. 
Stir a little bit, just till coated.
Microwave about 1 minute. (Watch carefully. The marshmallows will expand and could go all over the place).


Once you take it out of the microwave stir till the marshmallow is all melted.


Pour into a 8x8 pan sprayed with cooking spray.
Put in fridge for 45 minutes or longer.

Once time is up, take a knife and run it along the edges. 
Roll up, jelly roll style.


Take a knife and slice it into sections. 

There you have it. Spirals. Hope you enjoy them as we have.

Happy Baking!

Friday, April 4, 2014

Bacon Grease


What do you do with your bacon grease? Don't throw it down the sink as it will clog your pipes. If you save it to cook with then good for you. I don't save mine. I normally throw it out. How do you do that with out making a big mess? I take some aluminum foil and make a well in it and place it in a measuring cup. I then pour the hot bacon grease in and let it cool. When cool just carefully wrap it up and toss in the trash.


Thursday, February 20, 2014

Krispy Kisses


I made these with the Laurels in YW for Valentines day and they loved them. My kids wanted me to make some up for them as well so here it is.

We used regular crispy and chocolate crispy cereal. All together we used about 7 cups of cereal.


Take 3 Tablespoons of butter and melt in a large sauce pan over medium heat. Once melted pour in the marshmallows. You can use the small or the large, it is just one bag of whatever you use. Melt the marshmallows in the butter until melted, stirring constantly. Once it is melted, turn off the heat and pour in the the cereal and stir till combined.

Take a piece of wax paper for however many kisses you are making. I got 4 good sized  kisses out of this batch. Divide the cereal mixture up and put on each piece of wax paper. Using your hands form them into a Kiss shape. Then let cool.


 While those are cooling, take some almond bark and melt it. Once that is melted cover your cereal kisses with chocolate. (They kinda look like little volcanoes to me). Let that cool and dry.


 While the chocolate is hardening take some tissue paper and cut into strips. Write some little love note on the end. This is the little "flag thingy" that you find on kisses. You also need to get some Aluminum foil and have that in squares.


Take your hardened kiss and place it in the middle of the foil and wrap the foil around the kiss. Once you get to the top place the flag in and finish wrapping them up. 


Saturday, January 11, 2014

Waffle Sandwiches


One of my kids favorite dinners. Yes we have them for dinner. I am not a morning person so I don't really cook all that much in the morning. I however LOVE to have breakfast for dinner. This is one recipe that is easy to whip up.

Waffle Sandwiches

Cook up some bacon
Or you could use any type of breakfast meat,

Take some cheese,

 Toast some waffles.

Scramble some eggs.

Put it all together and there you have it. A waffle sandwich. Serve with a side of fruit and you got a yummy dinner. 


Happy Baking!

Monday, January 6, 2014

Bacon Quiche


This is another quiche that my kids enjoy. Bacon Quiche.

I started out by cooking a package of bacon. I like to cook my bacon on a cookie sheet at about 350 for  15-20 minutes or until crispy. I than take it off the pan and place it on paper towels to get the extra grease off. After it is cool chop the bacon into small pieces. Set aside.

Next get your pie crust ready. You can either make your own use the ones that are already made. I used a pre-made one for this recipe. If you pre bake the crust a short time before you add the liquid it doesn't make a soggy crust.

Once you have the crust done place the cheese and bacon on the bottom of the crust.

You than add the egg mixture which is egg, milk, thyme and pepper.

You than bake it in a 375 degree oven for about 30 minutes or until set.

Bacon Quiche

1 pie crust (either homemade or pre made)

Filling
1 package bacon cooked and chopped into small pieces
4 large eggs
1 1/2 cups milk
1/4 dried thyme
1/8 teaspoon pepper
1 cup shredded cheddar cheese

Crust pre-bake at about 400 degrees until 8-10 minutes. Let cool
In a mixing bowl combine the eggs, milk, thyme, and pepper. 
Put the bacon and cheese in the crust and pour the egg mixture on top of that. Bake at 375 degrees for about 30 minutes or until the filling is set. 
Serve with a side salad and enjoy.


Happy Baking!


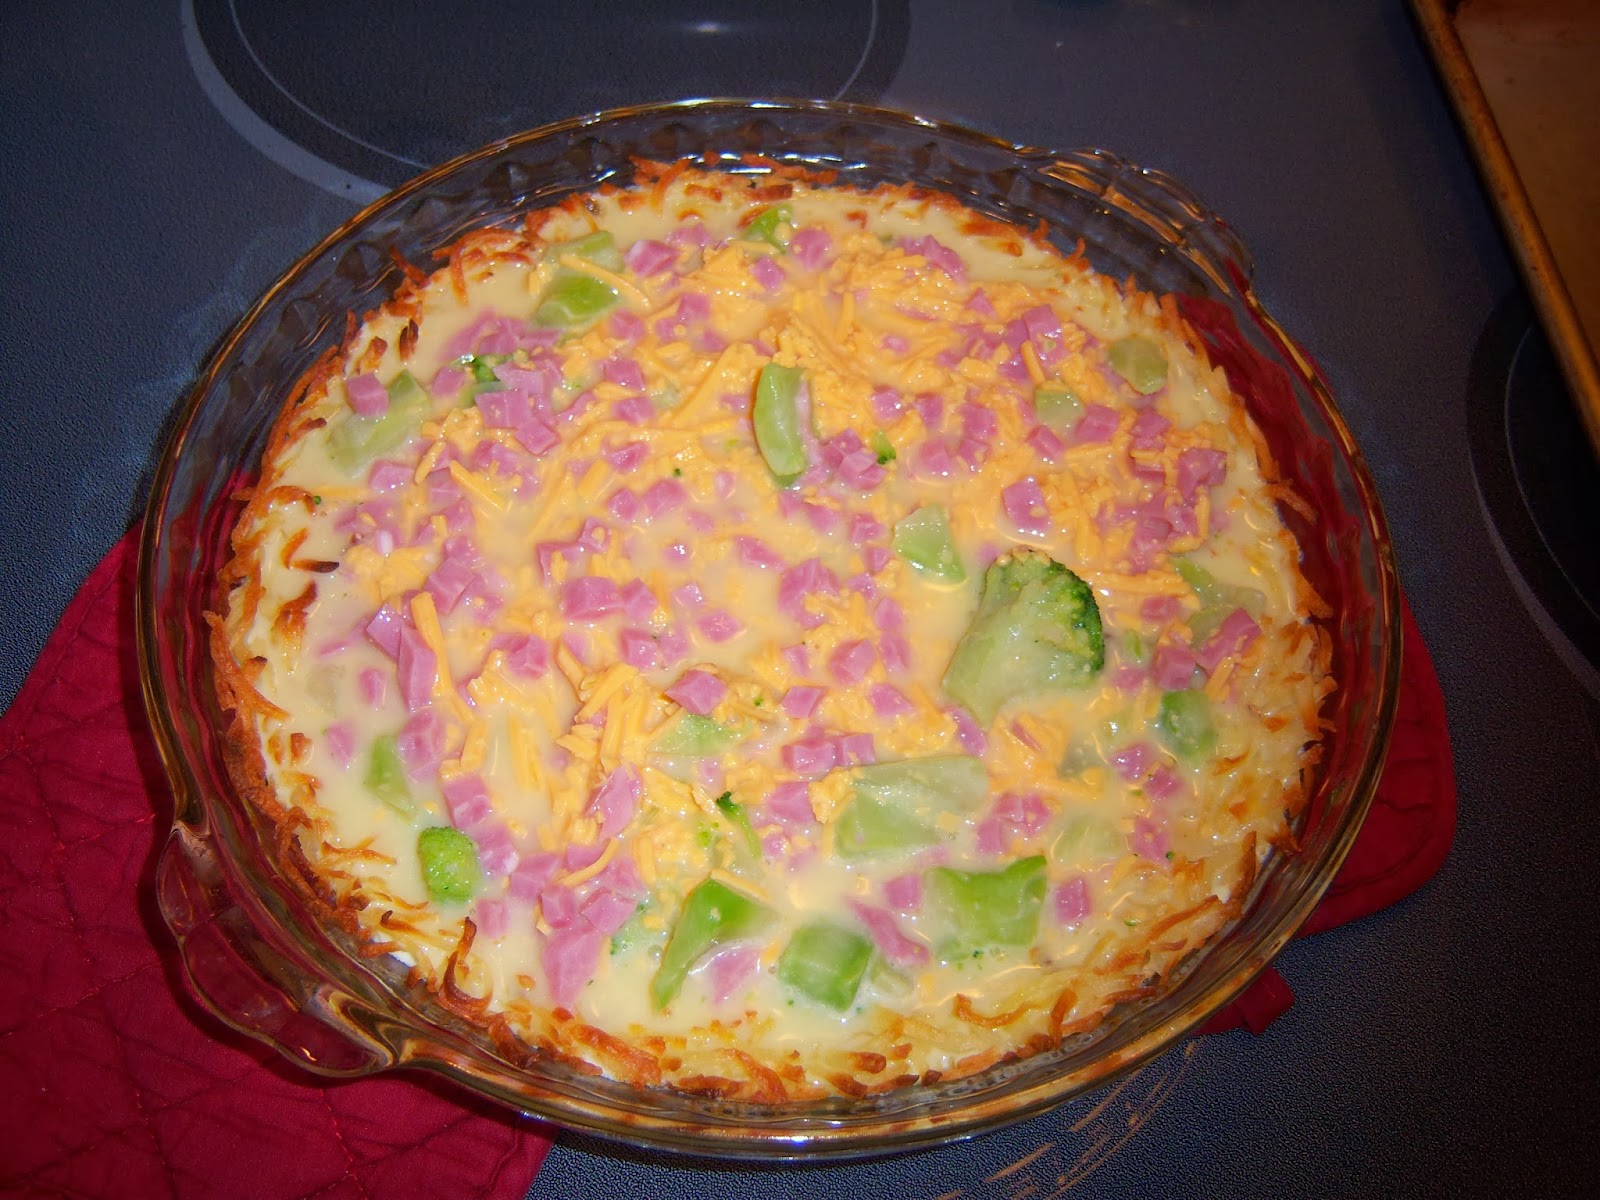
Potato Crusted Ham and Broccoli Quiche


I have been surprised that my kids like quiche. I wasn't a big fan of it when I was growing up so I never thought to make it for my kids. Well in the last year or so I have found they really like it. I try to make different types and they seem to like them all. This one turned out really good and we didn't have any leftovers. I got the recipe from Paula Deen off the food network. You can find the original recipe here.


The crust on this calls for frozen hash browns. I didn't have any of those but I did have these, Dehydrated hashbrowns.  All you do is add hot water to them and let them sit for about 5 minutes, drain the extra liquid off and there you go hashbrowns ready to cook. They taste pretty good too. 

Any ways you take the hashbrown potatoes and add a stick of melted butter. I ended up draining off the extra butter before I put them in the pan as there was a lot of extra liquid for my taste. You than form the potatoes to a pie dish and bake at 450 for about 20-25 minutes or until golden around the edges.

While the crust is cooking mix up the filling. 3 eggs, 1 cup Half and Half (I didn't have that so I just used regular milk). Chopped green onion, Broccoli, and diced ham and cheese.

 After you take the crust out of the oven reduce the heat to 350. Pour the egg mixture into the crust and bake in the oven for another 30-40 minutes.

The finished product. Serve with a side salad or fruit and you have a yummy dinner. 


Potato Crusted Ham and Broccoli Quiche

1 Stick butter
1 Cup half and half (or milk)
1 Cup thawed frozen hash browns
1 Cup shredded cheddar cheese
chopped green onion (to taste)
1/2 cup chopped ham
1/2 cup broccoli
3 eggs

Preheat the oven to 450 degrees. Spray pie pan with non-stick spray. Melt the butter and mix with the hash browns. Press into a pie pan to form a crust. Cook for 20-25 mintues.
Lower the oven to 350 degrees. Whisk eggs and half and half in a mixing bowl. Add the chopped onion, diced ham, broccoli and cheese. Mix. Pour into the prepared crust and bake for 30-40 minutes.


Happy Baking! 

Tuesday, December 10, 2013

Candy Cane Chocolate Lollipops

I thought I would share how to make these lollipops. They are really easy to make. 

Take two candy canes (you could also use small candy canes) and place them on a pan with either a silicone mat or parchment paper. You want to do this other wise they will be really hard to get off your pan. Place a lollipop stick in the middle of the two candy canes. I found these cute lollipop sticks at Wal-mart that I thought would work great with these.

Heat your oven to 350 degrees. Place the candy canes in the oven for 3-4 minutes. You don't want to go too much longer other wise you will completely melt your candy canes. When they come out use toothpicks or if you are brave, your fingers, and push the edges together making sure they are around the stick. Let cool.

 Take White chocolate almond bark and melt in the microwave. I found this year crushed peppermint candy. I was so happy because, normally I crush my own and it makes a lot of noise and mess. Take some of the candy and stir it into the melted white chocolate.

You than pour the white chocolate mixture into the cooled candy cane heart. You can then sprinkle more candy cane pieces on top or not. You could even sprinkle something else on it if you wanted. 

 Once hardened, you can wrap them up and display them some how or give them away as gifts (That is what I am doing).  


Happy Baking!

Monday, December 9, 2013

Apple Fritter Bites


I found this recipe on Pinterest about a year ago. I made it for our Churches annual Christmas Devotional that we watch each year. It is always a great way to start off our Christmas Season. 
Last year I when I made them we didn't have quite enough so (as we are a family of 6) so I doubled the batch this time. We had plenty this time. 

You start off by combining all the dry ingredients.
1 heaping cup of ap flour
1/3  cup sugar
1 tsp. baking powder
dash salt
1-2 tsp. cinnamon
1/4 tsp. nutmeg

Add the wet ingredients 
1/2 tsp. vanilla
1Tablespoon butter, melted
1 egg
1/3 milk, more if needed. (we added just a little bit more)


 And now for the apples. You want a nice small pieces. This part was hard me as I am allergic to apples in the raw form. They just make my skin itch and itch. (I need to invest in some food safe gloves). Anyways you need at least 1 1/2 cups of diced apples.

Mix all the ingredients together and that is when you want to add the extra milk if you think it is too thick. Just a little at a time though.

Heat up some oil in a pan and cook your fritters till they are nice and golden brown. Depending on how big you make them will depend on how long they will take to cook. Mine took anywhere from a minute to two minutes. 

Then as soon as they get out of the oil coat them in a powederd sugar glaze. That way the glaze dries on the fritter. We also rolled some in a cinnamon sugar mixture.


Here is the original recipe -Apple Fritter Recipe. Serve with some yummy Hot Chocolate and you have a great breakfast or snack.

Happy Baking!

Thursday, October 31, 2013

Helpful Tip

I thought I would share one of my little helps that I find useful in the kitchen. 
When a recipe calls for oreo crumbs and you can't find oreo crumbs in a box (they used to have them but I can't seem to find them anymore), or you don't want to sit there and scrape the inside out of the cookie. Get a Oreo Pie Crust. Break it up and there you go, you got your crumbs.


Sunday, July 7, 2013

Blueberry Pancakes with Peach Syrup

It's still summer time and I found some blueberry bushes in our back yard so we have plenty of blueberries. They are sweet and juicy. So I made blueberry pancakes. To go with them I made a peach syrup. I can only eat cooked peaches as I have an oral allergy to certain fruits, but that is another story. 


The pancakes are my dad's recipe which I think was also my grandpa's recipe I just added the blueberries to them.

Pancakes

2 cups flour
1 Tablespoon Baking powder
1/2 teaspoon baking soda
1/2 teaspoon salt
2 Tablespoons sugar
2 Tablespoon cooking oil
2 cups milk or buttermilk
2 tablespoons vinegar or lemon Juice
6 eggs, separated
blueberries

Mix together dry ingredients. Add the egg yolks right to dry mixture. Beat the egg whites until stiff, set aside. Add the oil, milk, and lemon juice. Stir thoroughly. Fold in egg whites. Place about 1/4 cup of pancake batter on a hot griddle. Add the blueberries. Cook till ready to flip and finish cooking on the other side.
Enjoy.

Peach Syrup

7 peaches, peeled, pit removed and chopped
1/2 cup water
2 tablespoons cornstarch
1/2 cup sugar

Place the peaches in a sauce pan. Add the water, cornstarch, and sugar. Stir till combined. Cook on medium heat till bubbly about 5-8 mintues. Use a potato masher and mash the peaches. Cook a little longer.
Either eat warm or let cool and enjoy.


Happy Baking!

Fresh Strawberry Pie


I love strawberry pie, but Fresh Strawberry pie is even better. 


This is the filling for the pie. It is chopped strawberries, sugar, corn starch, stawberry jello and a little red food coloring.

 The crust was a premade crust. After I made the filling I tossed the strawberries in with the filling and put it in the crust.

 Let it chill for a couple of hours and added the whipped cream around the edges.

 And there you have it a piece of Fresh Strawberry pie. It was very yummy and refreshing.

Recipe

1 refrigerated pie crust (baked) or you could make your own.

Filling
6 cups of strawberries
1 cup sugar
3 tablespoons cornstarch
1/2 cup water 
1 box strawberry jell-o  (3 oz box)
red food coloring if you want it

In a small bowl crush enough berries to make 1 cup. Place the berries in a sauce pan and add the sugar, cornstarch, water, and jell-o. Cook until mixture is bubbly and thickens, stirring constantly. Add food coloring if you want. Let cool until completely cool.

Either cut or leave the remaing strawberries whole and mix with the cooled filling. Place in the precooked crust and place in the refrigerated till set. Add whipped cream and enjoy.


Happy Baking!
Wednesday, May 29, 2013

Strawberry Hearts


It is Strawberry Season!! I LOVE STRAWBERRIES!! It is one summer fruit that I can eat. There are so many yummy things you can make with strawberries. Chocolate and Strawberries go so well together. I saw somewhere chocolate hearts. 

First step cut strawberries open and take out the middle part. Take a toothpick and join the two halves together. Fill the strawberries with marshmallow fluff.

\


Melt your chocolate and put all over the bottoms of the strawberries making sure the marshmallow fluff is covered up.


Once dry turn the berries over and coat the top of the strawberries in chocolate. Then drizzle with white chocolate, or red, or more chocolate, whatever you want.  Pretty quick and easy and so YUMMY.

Baked Oatmeal

Ok so I don't have a picture of this one. I made it the night before for breakfast. By the time I got home from work the next day it was gone. It was REALLY good. I found the recipe on Pinterest. So far most of the recipes I have made from there have been really good. You can find the recipe here

I did make some changes though. I left out the walnuts and used regular oats instead of gluten free. I added strawberries, blueberries and bananas. But you can add any fruit you would like. It is a keeper in my recipe book.

Monday, April 1, 2013

Chocolate Drizzled Caramel Popcorn


I love making Caramel Popcorn. This recipe is really good. It's a nice crispy caramel on the popcorn.

First off you need these items.
A popcorn popper. You can use microwave but use the natural unsalted type.
Popcorn.
Candy Thermometer 
Pot
Pan (9x13)
Tin Foil
Brown Sugar
Corn Syrup
Butter
Baking Soda 
Vanilla

First off you need to line your 9x13 pan with foil. It makes clean up a lot easier.
Pop your popcorn (1/3 cup to 1/2 cup unpopped). You will need about 8 cups. Carefully put popcorn in 9x13 pan so you don't get the kernels that didn't pop. Place in a preheated oven (300 degrees) to keep warm  till you get your caramel ready.

To make your caramel put 
3/4 cup packed brown sugar
3 Tablespoons Corn Syrup
1/3 cup butter


Stir your mixture, over a medium, heat till it starts to bubble. Put in the candy thermometer and stop stirring it. Wait till it gets to 255 degrees. Take it off the heat and stir in  1/4 teaspoon vanilla and a 1/4 teaspoon baking soda.

As soon as you stir it in pour the caramel mixture over the popcorn. Stir till coated. Bake in a 300 degree oven for 13 minutes. Take out and stir. Bake for another 5 minutes.


 Lay out a couple of sheets of foil on your counter. When the popcorn comes out of the oven give it another stir and then pour on the foil to cool. Break it into pieces. Take Chocolate and White bark and melt it in the microwave.  You can use a spoon to drizzle it all over or place it in a small sandwich type bag and seal it up, cut off the corner and drizzle it on that way. Let the chocolate set up and then enjoy.


Happy Baking!